I then created another layer to trace over some of the original lines I had already drawn and created quads which would allow me to smooth the face when I sub divide it. This would reduce pinching in the surface which is very difficult to get rid off and would also give more flexibility to the face.
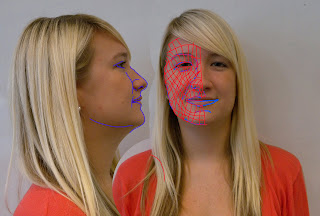
I found this quite difficult because sometimes with out realising I found I had created triangles in my face so had to erase them and draw the lines again so they equaled quads.
I then opened 3D Max and followed the tutorial. I found this tutorial quite straight foward and easy to follow it was basically setting up the image in 3D Max so it was in the right views for later tutorials.
I then had to draw the topology by drawing each one of the quads to convert them into a mesh which would fit to my profile. I created lines and matched them up to close the splines. I did however find that I had missed some of the quads out when I created the mesh, so needed to go back and change this.
No comments:
Post a Comment